
Okay, here’s that text completely paraphrased following all your guidelines.
Hiking the Inca Trail to Machu Picchu: What You Need to Know
The Inca Trail hike is super famous, maybe one of the best-known multi-day treks anywhere. It’s usually a four-day, three-night trip through the awesome Peruvian Andes mountains, ending up at the incredible old city of Machu Picchu (altitude about 2,430 meters or 7,972 feet) – yeah, one of those new seven wonders of the world. Anyone who’s done it will tell you it’s way more than just walking; it’s like a trip back in time and a real adventure. If you get a chance to do it, definitely go for it!
It blew my mind, honestly, but I definitely learned some things the hard way too. So if you’re thinking about hiking the Inca Trail, here’s the essential info to help you have the best time out there.
The Basics: Inca Trail Overview
- Distance: About 42 kilometers (26 miles). You hike from one point straight to Machu Picchu.
- How Long: The classic trek is 4 days and 3 nights. If you see shorter trips advertised, they’re not doing the full famous route.
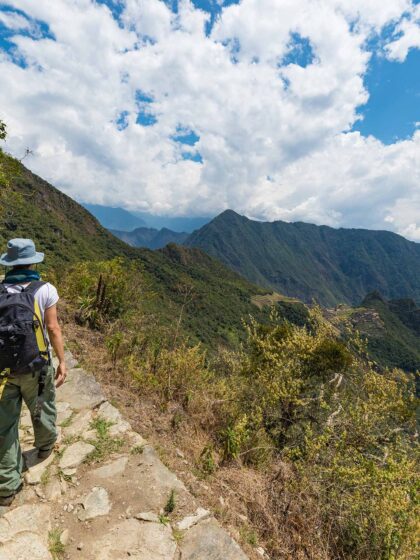
- How Hard: It’s pretty challenging, no joke. You’re dealing with high altitude which makes breathing harder, some really steep climbs, and long days on your feet. You need to be reasonably fit and ready to push yourself.
- Best Time to Go: The dry season is May through October. June to August is peak season (crowds!). We went in May and it was great – good weather, fewer people.
- How You Do It: This is important: you must book way in advance through an official tour company. They get your permit for you. Only a limited number of people (hikers and the crew) are allowed each day. You can’t just show up and hike it solo.
Key Things to Know Before You Hike the Inca Trail
It’s Not an Easy Hike
Seriously, this isn’t for total beginners or if you haven’t hiked much before. You’ll face tough uphill sections way up high where the air is thin. Days are long, and you won’t have comforts like a warm bed or shower. You need some physical strength and that ‘keep going’ attitude. But finishing it feels amazing!
Book Way Ahead & Get a Permit
Since 2002, you have to go with a licensed tour group. No independent hiking is allowed. I liked Intrepid Travel ’cause they seem to treat their porters well. Only 500 permits are given out for the trail each day (that includes about 200 tourists plus all the guides and porters), and they sell out super fast, like months and months ahead. Your tour company handles getting the permit, but you need to book your trip with them really early. Heads up: once the permit is booked with your name and date, you can’t change it.
It’s a 4-Day Route Breakdown
Most companies follow a similar plan. Here’s roughly what ours looked like:
- Day 1: Around 11km. About 550m climb. Kinda like a warm-up day, helps you get used to the altitude. Moderate effort.
- Day 2: Around 12km. BIG climb day – about 1200m elevation gain! This is where you tackle the famous Dead Woman’s Pass (up around 4,215 meters or 13,828 feet). It’s the toughest day. Going down the other side is pretty steep too!
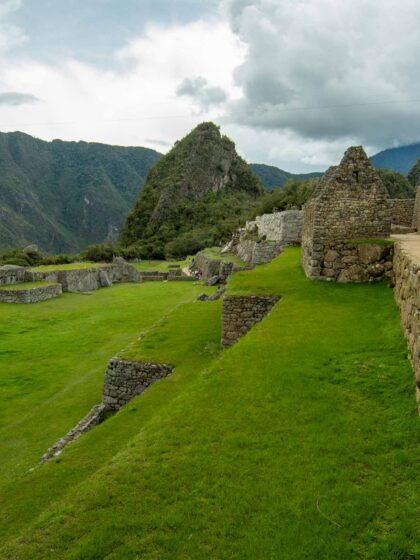
- Day 3: Around 13km. Mostly easier walking today. One tough uphill bit and then a long downhill (over 1000m elevation loss) which can be hard on the knees. Super cool day though ’cause you pass lots of old Inca ruins.
- Day 4: Shortest day, maybe 5km. About 170m climb. Mostly heading down towards Machu Picchu.
Big advice: take it SLOW. The altitude is the real deal here. Go at your own pace, take lots of breaks. It’s hard to catch your breath once you’ve lost it up there.
Campsites are Basic
You’ll be sleeping in tents. There’s no electricity to charge stuff and no hot water. Some campsites might have cold showers (ours did on nights 2 and 3), but honestly, it gets so cold at night a cold shower sounds awful. Most of us just washed up using a small bowl of warm water the crew gave us morning and night. That plus some face wipes worked okay to feel a bit cleaner.
The Toilet Situation… Varies
Day one, you might find some okay public toilets you pay a small fee for. After that, it gets more basic. The free public toilets later on the trail can be pretty gross, not gonna lie. Some people preferred finding a spot in nature. Good news is our tour group had their own pop-up chemical toilet tents at lunch spots and campsites. They were small but clean enough and did the job. Oh yeah, definitely bring your own toilet paper or tissues!
Expect to Be Off-Grid
For most of the hike, there’s no phone signal. Enjoy the break from your phone! There’s also no electricity, so bring a couple of portable power banks to keep your phone (for photos!) and camera charged.
You MUST Carry Your Passport
They check it when you start the trail and again when you enter Machu Picchu. Important: If you got a new passport after you booked your permit, you have to bring either a copy of your old passport or at least a clear photo of it. They need to match the permit number.
The Food is Awesome
I was totally shocked by how good the food was! The cooks were amazing. We got hot breakfast, a 3-course lunch, snacks in the afternoon (‘tea time’), and a 3-course dinner every day. It was tasty, had lots of veggies, and they handled dietary needs (like vegetarian, gluten-free etc) really well. Just make sure you tell your tour company way before the trek starts so they can plan.
Bring Your Own Snacks Too
Your tour might give you a couple snacks each day, but maybe they’re not your favorite things (mine weren’t really). You can buy some stuff like chocolate bars or Gatorade from local vendors on day one and maybe day two, but it’s expensive. If you like specific energy bars, protein bars, trail mix, or electrolytes, definitely bring your own stash.
Nights Get Very Cold
Days can get warm enough for shorts and t-shirts while hiking, but as soon as the sun goes down, it gets freezing cold. Pack layers, a warm hat, gloves, and thermal underwear. Pro Tip: Ask the cooks for some hot water to fill your water bottle or bladder before bed. Stick it in your sleeping bag – makes a huge difference warming it up! On night two (usually the highest camp), sleep with your phone and camera batteries in your sleeping bag too, so the cold doesn’t kill them.
Early Mornings are Standard
Most days, you’ll get a wake-up call around 5 am and be hiking by 6:30 am. Bedtime is usually early too, like 8 pm. The last morning is super early though – wake up around 3 am! You hike a bit then wait near the Machu Picchu entrance until it opens around 5:30 am (sunrise). They do this so the porters (who carry everything) can pack up and catch an early train home. It’s the least we can do after they work so hard.
The Trail Can Be Busy (Sometimes)
We actually found it pretty peaceful while hiking, usually only seeing other groups at lunch spots or campsites. The one time it felt really crowded was that final morning, waiting for the gate to Machu Picchu to open. It was packed! And then walking that last stretch, it felt like a race. We decided to just hang back, walk slow, and enjoy the views arriving at the city. It’s not going anywhere! Even if you rush to be first, everyone else arrives minutes later. Better to just enjoy the moment.
Bring Cash (Soles)
I brought about 500 Peruvian Soles. This is mostly for tipping the porters, cooks, and guides at the end. It’s customary and they work incredibly hard. Ask your tour company for their tipping suggestions, as it varies. We actually tipped more than they suggested because our team was amazing. Besides tipping, try to choose a tour company known for treating their porters fairly (like Intrepid). You might also use small cash amounts for those first-day toilets or maybe pricey snacks.
Wear the Right Gear
Make sure your hiking boots are broken in and comfortable! Good quality, practical hiking clothes make a huge difference to how you feel on the trail. Layers are key. (The original text mentioned a packing guide, but you basically want moisture-wicking clothes, rain gear, warm layers).
Machu Picchu is HUGE
When you finally arrive, it can be a bit overwhelming. After days in the quiet mountains, suddenly you’re in this massive ancient city with crowds of clean tourists! There’s a lot to see, usually different circuits or paths you can follow. Your guide will show you around, explain the history and Inca culture. Soak it all in – you earned it!
Money Stuff: Cash and Costs on the Trail
You’ll definitely need some Peruvian Soles in cash, especially smaller bills and coins. Here’s a quick look at what you might need money for:
| Item / Reason | Why You Might Need Cash / Cost Involved | Notes |
| Tips for Crew | Standard practice to tip porters, cooks, guide | Main reason to carry cash. Ask company for suggested amounts. |
| Toilets (Day 1) | Small fee often charged for public toilets | Usually just 1-2 Soles per use. Need coins! |
| Snacks / Drinks | Buying extras from vendors on Day 1/2 | Optional, can be expensive compared to Cusco prices. |
| Permit Cost | Included in your tour package price | You pay this when booking your tour, not cash on trail. |
| Gear Rental (Optional) | Sleeping bags, poles might be rentable | Usually paid to the tour company before the trek. |
| Personal Souvenirs | Maybe small items sold near Aguas Calientes | After the trek usually, not really on the trail itself. |
Guideline: Carrying around 500 Soles per hiker is often suggested, mostly earmarked for tips. Adjust based on your company’s advice and your spending habits for extras.
No comment yet, add your voice below!